Saturday, December 31, 2011

Dressing Your Age-- What Does That Mean Anymore?


Dressing Your Age-- What Does that Mean Anymore?
I am one of those people who forgets how old I really am sometimes.  I think I’m stuck somewhere in my late 20’s and admittedly sometimes like to dress like I'm still in my 20's too. Not by shopping in the juniors department, but I love to wear clothes with feminine touches, and I love to wear a lot of color and trendy jewelry sometimes.  I wonder sometimes if I should revamp my whole style and give up those things that I love because I really fall into the 30-something age range.
After doing some researching and thinking on the subject, it seems that anymore fashion rules are made for both following and breaking. I think we can thank our beautiful friends in Hollywood for that! With diet and exercise (and of course a few nip-tucks here and there) many people are looking so much younger than they really are, allowing them to get away with dressing younger for longer.   But since not all of us can look quite as awesome as our celebrity friends (remember that is their job to look great), it's probably good to have a few rules to follow (or break if you want).  Ultimately though here is what it boils down to-- wear what makes you feel great and what you feel most confident in! Wear what you LOVE!!!
With that being said, there are no hard and fast RULES, but here are a few tips that will help you look great at any age: 
1)Wear clothes that fit well despite the size. Don’t demand to squeeze into an 8 if a 10 fits better. Sizes vary from store to store and clothes that are too tight can make you look heavier (think muffin top.)
2) Don’t adopt a trend if it doesn’t work for your body style. The skinny jeans trend was so tempting for me, however I have bigger calves and that style of jeans just doesn’t look good on me, so I don’t wear them.
3) Don’t forgoe style for comfort. Let’s not look like we’re going to the gym all the time.
4) The older you get, the better quality fabric and make of the piece should be. 
And here are some "rules" for each age range as well. Feel free to break them as you wish:
20’s:  In your 20’s, anything goes. It’s about personal style, lots of color, very high heels and hemlines. You can wear flirty, feminine styles as well as edgier pairings.  Try to avoid nude pantyhose and pants with pleats.  Lots of jewelry is great—from long necklaces to bangles.
30’s: It’s time to get a little more serious with fashion-forward styles while keeping  a polished look. Start looking for better quality pieces in your 30’s and make investments in pieces that stand the test of time. Forget trends that don’t work with your body type. Throw in a few trendy pieces here and there.


Style icon Sienna Miller is in her 30's!


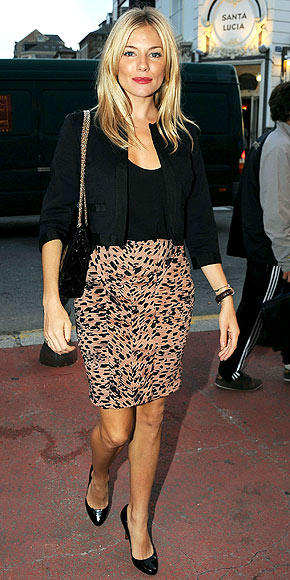
I love this outfit, and Sienna Miller's style. She is one of my absolute favorites!


40’s: Stick with classic silhouettes and colors but add interesting embellishments, vibrant colors and patterns. Avoid ruffles and bows, eyelet tops, as well as matronly-looking pastel separates and shapeless suits.  You can forget the old rule of keeping the hemline below the knee after 40. If you feel comfortable in it, go for it and if you are in good shape, you can wear almost anything. Again, let your confidence be your guide.


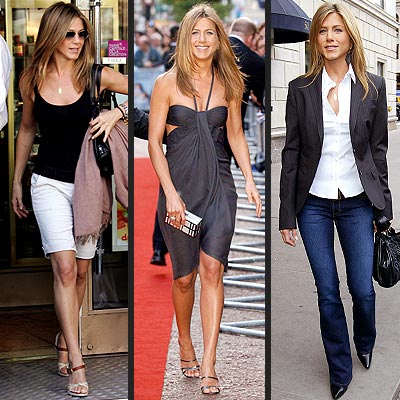
Style icon Jennifer Aniston is in her 40's!


50’s: Tailoring and structure are important. Stick to clean lines in a simple palette.  Statement pieces like a chunky necklace or signature cuff go further in your 50’s than a strand of pearls for instance. Monochromatic outfits are great, smart-looking choices that make a statement too. Don’t go overboard with the casual outfits—keep them current.


Style icon Sharon Stone is in her 50's!


60’s: Traditional pieces should keep you looking elegant. Black, white and red make bold statements and  tweed suits, trousers and coatdresses are great items to have. Splurge on fur-trimmed items or brocade.  Throw on a wrap for evening if you aren’t happy with the tone of your arms and show some leg if you want to.  


Tuesday, December 20, 2011

Say Cheese! Tips for Looking Your Best in Pictures!


Have you ever noticed how some people ALWAYS seem to look great in pictures?   It often suprises me how some people look nothing like themselves in pictures.  I'm not sure how this happens, but here are some tips to help you look your best during the holidays or anytime!

1. FIND NATURAL LIGHT. Stay away from overhead lights, and look for places with good natural light for a picture. Believe it or not, an overcast day is one of the best opportunities for outdoor pictures because of the diffused natural light. Similarly, inside picture taking is enhanced when lots of natural light makes it way in through windows, and then you can supplement with artificial lighting (whatever lighting is in the room.)
2. STAND TALL...and look thinner. Turn slightly to the side so that one shoulder is closer to the camera and then look forward to the lens.
3. AVOID THE DOUBLE CHIN- Make sure that your picture taker is taller than you or you’ll end up with a double chin. Lens should be at eye level or above. Push your chin out an inch or so more than normal also.
4. TAN (IN A BOTTLE OF COURSE)- I always feel like I look better in pictures if I have been using sunless tanner on my face and neck. Especially in the winter. It just gives you a little extra glow.
5. BRIGHTEN YOUR SMILE- Use teeth whitener, and apply shiny gloss to your lips. This does two things—helps you smile wide and makes your mouth look fuller. If you wear lipstick, go with a shade that is two tones darker than your natural, and only wear a natural color liner. You should still put gloss on top.
6. KEEP IT MATTE- Do not have any shine on your skin. Keep it matte with extra powder. This is really important. NO SHINY SKIN!
7. FOCUS ON THE EYES- Make your eyes look larger by blending darker shadow colors in the crease and light, shimmery ones on the brow bones. Apply eyeliner from the outside of the lower lash to almost the inner part. You may also want to wear an extra coat of mascara.
8. GET A GLOW- Blush is tricky. You should wear some, but not too much. Practice around with it. I like to put a peachy-pink cream blush on the apples of my cheeks and then go over it with blush cheekbones, forehead, nose and chin.
Last tip—think of something really funny or that makes you happy (your kids; your dog; your grande, skim, extra-hot latte with whip) to get a natural smile during pictures. The best pictures are the ones where you genuinely are feeling happy!


Sunday, December 18, 2011

A Holiday Tradition- Almond Crescent Cookies

When I was a little girl, my mom always baked 3 or 4 different types of cookies around Christmastime and by far my favorite were her Almond Cresents! I really have a hard time resisting them when they are sitting on my counter-- they are so buttery and sweet, and just melt in your mouth. It doesn't hurt either that they are easy to make! Keep reading to learn how to make them yourself!


Ingredients:
1 2/3 C. almonds
1 1/4 C. flour
1/4 C. sugar
1 C. butter
1 teaspoon vanilla extract
1 C. powdered sugar

Directions: Place almonds into food processor to finely grind and measure 1 2/3 cup of the ground nuts into a large bowl.  Add flour and sugar and then work in butter and vanilla extract. The butter can be softened a little before adding. You may need to use your hands to really work the butter into the mixture. Refrigerate for an hour and then roll dough into balls (about 1 1/4 in.). Don't skip the refrigeration part or the cookies won't keep their shape.  Bake on an ungreased cookie sheet at 350 degrees for 12 to 15 minutes until lightly browned. Cool on pan for 10 minutes and then sprinkle with powdered sugar, if desired. Makes 25 to 30 crescents.


Finely grind raw almonds.


Ground almonds should look something like this.


Work butter and vanilla  into flour/sugar/nuts mixture. 


Form into little balls like this approximately 1 1/4" in diameter.


Final product! Yummy!

Saturday, December 10, 2011

DIY- Make Beautiful Jewelry!

So here are some pieces of jewelry that I made using a couple of simple techniques. With minimal investment in supplies and a little time, you can do it too. I love making jewelry, and have played around with it for several years. So many times I don't see what I want in stores, so I make it myself instead.

Each piece below starts with a silver chain; some straight pins; beads (I use a lot of freshwater pearls in various shapes, but you can use whatever you like); and jump rings. All of these items can be purchased at Michael's crafts or a beading shop. If you really get into it there are some online places that sell supplies at wholesale prices too.  


Silver Freshwater Pearl Necklace


Silver Freshwater Pearl Necklace with Ceramic Bird Pendant


NOW MAKE ONE YOURSELF!

Okay, so the same technique is used to make all of these pieces. I will show you how to attach one bead to a chain necklace. Once you can master this skill you can pretty much create all of the jewelry shown above, and then some! You can use the same skill to attach all sorts of beads in different sizes, colors and shapes. And remember, the bead shops have amazing selections-- you may get a little carried away because there are so many beautiful beads to choose from!


STEP 1- GATHER SUPPLIES. So shown here is a long silver chain (I get the 18" longer-length sterling silver chains), a straight pin, a potatoe pearl, and a jump ring. The tools shown include a pair of needle-nose pliers, flat pliers and wire cutters. You can buy all of this at Michael's or a bead shop.


STEP 2- PUT THE BEAD ON THE STRAIGHT PIN. Simply slide the bead over the straight pin and pull it all the way to the bottom until it stops.


STEP 3: TRIM THE STRAIGHT PIN. Trim the straight pin so that there is about 3/4 of an inch of pin remaining.


STEP 4: WRAP THE WIRE AROUND THE NOSE OF THE PLIERS TO CREATE A LOOP. Using the needle-nose pliers, tightly wrap the wire around the tip until it curls all the way to the bead. It should create a loop that you can attach a jump ring to.


STEP 5: PUT THE JUMP RING THROUGH THE LOOP AND THE NECKLACE.  So here is the jump ring going through the loop you just made out of the straight pin and then also through one of the links on the necklace. (If you want the bead to slide on the chain instead of being fixed in one spot, then attach the jump ring around the necklace instead of through one of the links.)

STEP 6: CLOSE THE JUMP RING. Using the flat pliers, close the jump ring shut and you're finished! That was one bead. Just keep adding where you want with the beads you love until you have the look you want!


Thursday, December 8, 2011

Make an Inspiration Board! (Or a really cool corkboard for anywhere!)

I had the MOST fun making this for my office. This is an inspiration board to hang on my wall, and you can make one too for whatever your interests may be! An inspiration board is great for collecting ideas that of course inspire you!  Although this one is for my office, you could make a fashion-related one to hang in your closet, featuring all of your favorite looks and ideas! I also think you could make smaller versions with someone's name to be used as a corkboard. Would make a cute Christmas present!

So here is how I made it:

1. I took a large regular corkboard with a wooden frame and spray painted it gold. (You could do silver or try another color but I really love the metallic.)
2. I bought self-adhesive silver letters from Michael's (I bought two packs by "Recollections" and started playing around with the words until I came up with my scrabble-style design.) * Just a reminder not to remove the sticker back until you are sure of what you want to do with the letters.
3. I went through some recent magazines to find things that I really love and attached them with plain silver push-pins. I also made some flower push pins out of paper flowers (by Gartner/BRIDES "White and Black Confetti" available at Michael's also.) They are easy to make- just put a pin through the center of a flower. I filled in spaces where there weren't any pictures with little bunches of these.
4. I also added a few big silver snowflakes-- you can add whatever you like!
5. You can't see it but I attached a really wide pink ribbon tied in a huge bow at the top. I'll add more pictures as soon as I can so you can see!

If you make one, post a picture on Facebook. I'd love to see!


Some of the items used in this project are now available on Etsy! Click the links below the pictures!


Friday, December 2, 2011

7 PRETTY Awesome Money-Saving Tips for the Holidays!

Alright, there is nothing glamorous or pretty in this post, but possibly these tips will leave you with some extra cash in your pocket after the holidays are over.  The average American will spend close to $700 this year on holiday purchases. So here are a few tips to help you get the most bang for your buck this year.  Our holiday gift guide is coming soon for unique gift ideas at great prices, so stay tuned!


  1. Make a shopping budget. I know we all hate that word, so call it something else if you must. Take a few minutes to make your list of people and how much you would like to spend on each. If you come in under that amount (let’s say you budget $30 for grandpa and you find a great gift for $20), resist the temptation to find another gift for $10. Keep the cash and consider yourself under budget!
  2. Follow your favorite stores on Twitter and Facebook. Retailers many times offer special discounts to their cyber friends that you would not want to miss! You can search their recent posts to see if you’ve missed anything.
  3. Visit giftcardrescue.com and giftcards.com to buy discounted cards (some will give you $100 worth of merchandise for $80). Retailers include Apple Store, Radio Shack, Sears, Home Depot and others are available. Make sure you read the fine print for any limitations.
  4. Don’t forget to negotiate. We’ve heard of people negotiating deals at retail stores like H.H. Gregg and with various online stores via their “chat” or live help” button! Ask them to check with the manager and if they can’t do it, try somewhere else.
  5. This is one of my favorites! Find discount codes at retailmenot.com, secretprices.com and freeshipping.org  Look up your online retailers first before checking out and see what you find!
  6. Agree with certain groups of people (like adult family members) that you either don’t exchange at all or do something creative instead.  In my family we agree to do “make it, shake it, or bake it.” This means everyone can exchange gifts so long as they are either home-made (“make it”); a performance (this is “shake it” and I’m not joking some of our family members put together dance routines as their gift and they are so hilarious); or home-baked (of course this is the “bake it”). It’s really fun. The other side of our family does a Secret Santa gift exchange where everyone buys one gift for just one other person in the group. Designate a dollar amount and have someone draw names out of a hat. 
  7.  Use cash to shop. If you’ve budgeted $500, take out that much from the bank, put it in your wallet or an envelope and DON’T sign up for any credit cards while your shopping! Stay on your budget for each person and hopefully you will have a little extra when you leave!